Old versions of Windows such as XP were easy to image. We installed the OS and the apps, applied the updates and then took the image of the computer. We then deployed that image to dozens or perhaps thousands of similar computers. We might have used third party utilities along the way to help with hardware drivers so the imaged machines just worked upon boot.
Enter Windows 8, 8.1 and now Windows 10 and the “consumer experience” apps that install when the first login occurs. These apps provide games and fun phone-like utilities and minor productivity programs…and they will corrupt your image making it fail when you try to deploy it.
I’ve put in a lot of hours in recent imaging projects rolling out Windows 10 to either upgrade from Windows 7 or to deploy Windows 10 the way the customer demanded. Each “image restore” has been a crapshoot due to the APPx “applications”. Some machines restore while others crash by 25% of the restore process. If a machine image restore completes the OS may or may not boot without first completing the SFC /scannow process. Or it may blue screen periodically after deployment for no real reason as we’ve seen at more than one client this year.
This image corruption likely happens with imaging procedures using System Center Configuration Manager from Microsoft, ZENworks Configuration Manager from Micro Focus and very likely many other imaging programs. I only claim experience and knowledge with the two mentioned apps. One of my customers abandoned ZCM imaging and put in a FOG server because she was tired of fighting with the Windows OS after image deployment.
When imaging kept failing during a January 2018 project we were quick to blame the imaging engine provided by ZCM rather than the imaged OS or the vendor who believes it should install “customer experience” applications (i.e. Microsoft) to make your corporate desktop “fun” like your phone.
Imaging was Complete Success!
This past week I put “new-to-me” Windows OS building techniques into place and imaging was a complete success! The customer and I used the newest ZENworks Configuration Management (ZCM) 2017 Update 2 (2017.2.0 with the 3/2018 Imaging Update). We could have done the same with SCCM too but since they own ZCM we used it and will continue to.
The First Steps
The first step was to build the blank virtual machine with the appropriate hard drive, RAM, processor, etc. We connected the Windows 8.1 ISO to the virtual machine and after modifying the boot options to allow us 10 seconds to get into the running VM, we started the process. (Note: it isn’t required that you modify the boot options but I always do so I can “click into” the VM and access the boot manager.
We built the OS in the exact same everyone builds a Windows OS nowadays. Boot up from the DVD (or ISO) and choose to install the OS on a blank partition. And then we changed something so that Microsoft wouldn’t be allowed to push apps (APPx) stuff to us. We disconnected the network interface, and as such disconnected from the Internet.
You have to create a user account during the OS build. I typically call this user either “user” or “tech” and I put a basic password on the account. If the computer (VM or physical) is connected to the network/Internet, Microsoft starts behind-the-scenes downloading of “stuff” upon first login and if that “stuff” is installed, your image will very likely fail at some point. You’ll successfully “make” or “take” an image but you won’t likely restore it successfully.
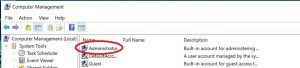
Figure 1: Computer Management Console – Enable Administrator account
With the network/Internet disconnected, login as user or tech. Open the Computer Management console and enable the Administrator account and change the password to something secure that you will remember as you’ll be using it for the remainder of the computer build, prior to taking your image.
Logout as user or tech and logon as administrator.
Return to the Computer Management console and delete the “build user” account (I called it user or tech for this article). Open File Explorer and delete the “build user’s” profile directory and then empty the trash.
Connect the VM or physical computer back onto the network/Internet. Now that you’ve removed the build user and enabled the built-in administrator, you can begin the process to install your apps, configure other logon accounts, and most importantly get all of the exciting Windows Updates downloaded and installed.
Ready for Sysprep
When you’re done with the computer/applications build and the updates are in place you’re ready for Sysprep. Sysprep is an included utility that strips away the SID (security Identifier), computer name, and much of the hardware-related drivers. You run this utility with its default setting plus the Generalize selection. Be sure to choose Shutdown as well because we want our computer off before we boot up with the ZCM Imaging Boot CD.
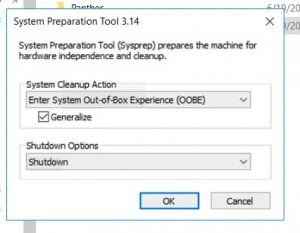
Figure 2: Sysprep for Windows 10 dialog
If your build machine is virtual you should plan on three snapshots: 1) right after OS build and the built-in Administrator account is enabled. 2) After all Windows and Office updates are installed (you’ll also have to install Microsoft Office assuming you plan on using Office software on your new computer). And the 3rd snapshot is taken with all apps done, configuration set but before Sysprep.
Once Sysprep is complete and the system shuts down, you’re ready to connect the Imaging Boot CD to the it and boot into the Linux Imaging engine. The ZCM engine is powered by SuSE Linux Enterprise Server 12sp3. You can also use PXE boot or Preboot Services to boot the ZCM Imaging OS engine.
Go through the normal steps to Make your Proxy (MP) image. Our image make process took about 65 minutes. Once our new image was completed, we connected a blank, to-be-imaged physical computer to the network and booted up to the Linux Imagine engine with a bootable USB stick. The bootable USB was created using the latest ZCM imaging bootcd (bootCD.iso) and the free Rufus utility. Once booted up to the ZCM linux engine, we used Manual or Maintenance mode so we could manually launch the img utility to restore our image. It restored in about 18 minutes.
Finalizing Post Imaging Process
Overall, we waited about 18 minutes for the 17 GB image to deploy to the physical hardware. We took about 10 more minutes to install the ZENworks Configuration Management client agent (ZAA), the Micro Focus Open Enterprise client and the Sophos A/V client. That took about 30 minutes from start to finish. It was taking our client nearly seven (7) hours to deploy a computer without any imaging product.
Giving credit where credit is definitely due: All of the above techniques were provided to me by my long-time friend and professional colleague, Dave Barker who is an expert instructor and field engineer for Training Concepts in Columbia South Carolina. Thanks Dave for the excellent OS building procedures!!